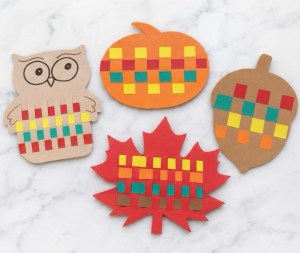
Paper weaving is more than just a pretty fall craft! It encourages hand-eye coordination, fine motor development, concentration, sequencing, and pattern recognition. Have a pumpkin, maple leaf, acorn, and owl get a colorful makeover as little hands weave strips of colored paper in and out to create their own autumn masterpieces. Let the kiddos in your care choose their own colors and patterns — there’s no wrong way to make autumn art!
You Will Need:
Autumn-colored cardstock paper
Scissors
Glue stick
Pencil
Ruler or Paper Cutter
Simple pumpkin, maple leaf, acorn, and owl templates (or draw your own)
Optional: Googly eyes or markers for decorating
What to Do:
1. Make your shapes.
Trace or draw a pumpkin, maple leaf, acorn, and owl onto cardstock paper. Cut out each shape.
2. Prepare the weaving base.
Fold each paper shape in half and make several evenly spaced cuts from the folded edge toward the opposite edge, stopping before cutting all the way through. Unfold to reveal the weaving slits. Nannies can help younger children with this step.
3. Cut the weaving strips.
Cut narrow strips of cardstock paper in a variety of autumn colors by using a paper cutter or ruler and pencil to cut straight strips. Make sure the strips are long enough to weave across each shape.
4. Start weaving!
Show children how to weave one strip over and under the slits, then weave the next strip in the opposite pattern. Continue alternating over and under until the shape is filled with colorful paper.
5. Secure the strips.
Turn the shape over and add a little glue to the ends of the strips to keep them in place. Trim any excess paper sticking out beyond the edges.
6. Add the finishing touches.
Decorate the owl with eyes, a beak, and feathers, or add details to the pumpkin, acorn, and maple leaf with markers or additional paper.
References:
Idea from Artsy Crafty Mom
Templates: pumpkin, maple leaf, acorn, and owl.
Photo by Stephanie Felzenberg
As an Amazon Influencer, I earn on qualifying purchase at no extra cost to you.


Leave a Reply