Halloween isn’t just about costumes and candy — it’s the perfect time for nannies to bond with the kids they care for through baking homemade treats!
Here’s why:
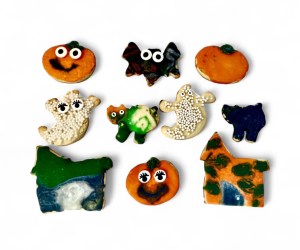
Creativity & Fun: Making cookies allows children to unleash their creativity by decorating cookies with frosting, sprinkles, and edible eyes. It’s hands-on, messy, and unforgettable fun.
Teaches Skills: Kids learn essential life skills like measuring ingredients, following a recipe, and teamwork. Plus, it’s a sweet way to sneak in some math and science!
Building Traditions: Baking together creates lasting memories and traditions that can carry on year after year. Think of it as a recipe for connection.
The Ultimate Reward: The best part? The cookies! After all that hard work, everyone gets to enjoy the delicious results together. It’s a treat for the taste buds and the soul.
So, this Halloween, grab the flour and frosting, and make the day a little sweeter with some homemade treats!
You Will Need:
2 cups white sugar
1 ½ cups butter, softened
4 large eggs
1 teaspoon vanilla extract
5 cups all-purpose flour
2 teaspoons baking powder
1 teaspoon salt
Halloween Cookie Cutters
Baking Sheets
Candy Eyes
Cookie Decorations
Bowls
Stand Mixer or Electric Beater
Royal Icing:
4 Tablespoons meringue powder
4 cups powdered sugar (about 1 pound)
6 Tablespoons warm water + additional 3-4 additional tablespoons for thinning to flood consistency
1 teaspoon vanilla extract
Gel food coloring
Stand Mixer
Piping Bag fitted with a Wilton #2 or #3 tip
Wooden Tooth Picks
What to Do for Cookies:
1. Beat sugar and softened butter together in a large bowl with an electric mixer until smooth.
2. Beat in eggs and vanilla. Stir in flour, baking powder, and salt. Cover, and chill dough for at least 1 hour (or overnight).
3. Preheat the oven to 400 degrees F (200 degrees C). Lightly dust a work surface with flour. Roll out dough to 1/4 to 1/2 inch thickness.
4. Cut into shapes with Halloween cookie cutters. Place cookies 1 inch apart on ungreased baking sheets.
5. Bake in the preheated oven until cookies are lightly browned, 6 to 8 minutes. Carefully transfer cookies to a wire rack and cool completely before decorating.
Making Royal Icing:
1. In a large bowl of a stand mixer, whisk together the meringue powder and powdered sugar, then slowly mix in the water and vanilla extract while the mixer is running on medium-low speed. Increase speed to medium-high and beat until stiff peaks form, around 5 minutes. This can be done with a hand mixer, but will take a couple minutes longer.
2. Divide the thick white icing into individual bowls and add gel food coloring, a few drops at a time, mixing well until you achieve the shades you like. From there, you can reserve some of the thicker icing for piping borders as described in the post, or thin all of the icing to flood consistency.
3. To thin each color to flood consistency, add 1 teaspoon of water at a time and stir well, continuing to add water by 1/2 teaspoon increments until you reach your desired consistency. If you are thinning the entire batch of icing at once to flood consistency, it will take an additional 3-4 tablespoons for a total of 9-10 tablespoons of water.
4. Once your icing is colored and the right consistency, scoop it into a piping bag fitted with a Wilton #2 or #3 tip. Decorate your sugar cookies by first outlining the border, then filling in the middle with flood icing which should settle into itself. Use a toothpick or scribe tool to fill in any gaps by spreading the icing around, then tap the cookie on the counter a few times to help the icing settle into a smooth, even layer.
5. Dry cookies at room temperature for 6-8 hours until the royal icing is completely firm before adding additional layers or design or stacking for transport.
References:
Roll Out Cookie Recipe from All Recipes
Icing Recipe from houseofnasheats.com
Photo by Stephanie Felzenberg
As an Amazon Influencer, I earn on qualifying purchases.

Leave a comment