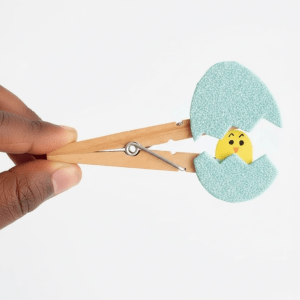
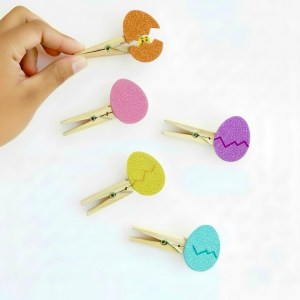
Little ones will love making these Peek-a-boo Clothespin Eggs I found on the One Little Project web site. The kids in my care were excited to see the chick play “peek-a-boo” when the egg opens and closes with a clothespin. It turns a simple craft into an interactive toy, sparking imagination, fine motor skills, and plenty of giggles along the way. Perfect for Easter, this activity keeps kids engaged and proud to show off their adorable, pop-open creations!
You Will Need:
Glitter Craft Foam Sheets
Wooden Clothespins
Yellow Cardstock
Crafter’s Tape
Black and Orange Gel Pens or Markers
Scissors
What to Do:
1. Start by cutting out a small rectangle of glitter foam, about 1.5″ wide by 2″ tall, then trim around the corners to turn it into an oval egg shape.
2. Cut a zig zag shape across the egg. I recommend drawing a line with a pencil on the back of the egg before you cut. You don’t have to, but it makes the zig zags look way better if you’ve planned them out a little bit.
3. Pinch open the clothespin. While it’s open, add a small strip of crafter’s tape to 3/4″ of the side, front edge of the top and bottom where the egg is going to go.
4. Make sure the clothespin is open when you add the crafter’s tape so you don’t accidentally tape it shut.
5. Lay the egg upside down on the table, making sure the top and bottom egg pieces are lined up and together.
6. Carefully press the clothes pin onto the back of the foam egg so that the opening in the clothespin lines up with the opening in the cracked egg.
7. Try to line it up so that the end of the clothespin where your chick is going to go is in the middle of the egg.
8. Cut out a tiny chick shape from yellow paper or cardstock about 1/2″ wide by 3/4″ tall.
9. Then use a black gel pen and an orange gel pen (or black and orange markers) to draw the eyes and beak onto the little paper chick shape.
10. Take a tiny piece of craft foam or cardboard, or anything else with a little bit of thickness to it and using crafter’s tape to attach it to the back of the clothespin where the chick is going to go so that the chick isn’t crushed by the clothespin.
11. Then add a little bit of crafter’s tape to the paper chick and attach it to the little foam spacer you just attached.
12. When you flip it over to the front, you should be able to see the top of the chick’s head and the entire face when the clothespin is open. If it’s not in the right position, just peel off the chick and adjust it.
13. Then repeat in a bunch of different colors.
References:
Idea from One Little Project
Photos by Stephanie Felzenberg
As an Amazon Influencer, I earn on qualifying purchases.

Leave a comment